How to build and support .NET 6 and VS 2022 projects using Azure DevOps Server 2020 - UPDATED
Preparing your Azure DevOps Server for CI/CD using .NET 6
Update (2022-03-15)
Jesse Houwing has created a simpler way to install the tasks using an extension in the Azure DevOps marketplace:
It also includes the latest vstest and testplatforminstaller tasks.
You still need to upgrade the agent and set the environment variable though. In the git repo for the extension you’ll also find zips for all of the building tasks.
Introduction
.NET 6 and the Visual Studio 2022 have been here almost more than a month, but if we would like to support projects like this with Azure DevOps on-prem version both on build and release pipeline, it could be challenging at first sight.
Below you can find a typical error message from a build pipeline when your development environment (I mean build server level build system) isn’t ready to support .NET 6 projects yet:
##[warning]C:\Program Files\dotnet\sdk\6.0.100\Sdks\Microsoft.NET.Sdk\targets\Microsoft.NET.Sdk.DefaultItems.targets(134,5): Warning NETSDK1182: Targeting .NET 6.0 in Visual Studio 2019 is not supported.
I think resolving this problem isn’t trivial based on the error message itself because this is just a general error message, and it tells nothing hint about the solution.
Under the hood, the real problems are that (not in the list of importance):
- improper msbuild.exe version (which creates the build/artifact as the result of the build process)
- incorrect build task (which calls the msbuild.exe)
- mistaken “boss” (who is trying to coordinate the whole process)
In a nutshell the Azure DevOps Server’s build (and release) pipelines are supported using build tools, agents and tasks. Unfortunately, there is no next-next-finish solution for any release of Azure DevOps Server that could upgrade these components, and after that, we can use the new technologies mentioned in the introduction.
In this article I would like to share a way how we can upgrade an Azure DevOps Server build system, which method probably will also work in case of the next .NET or VS generation too.
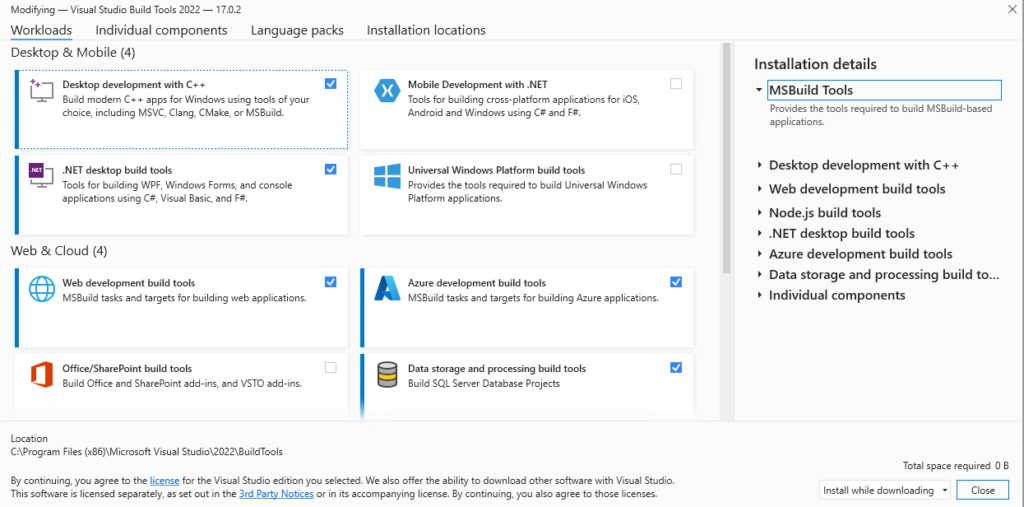
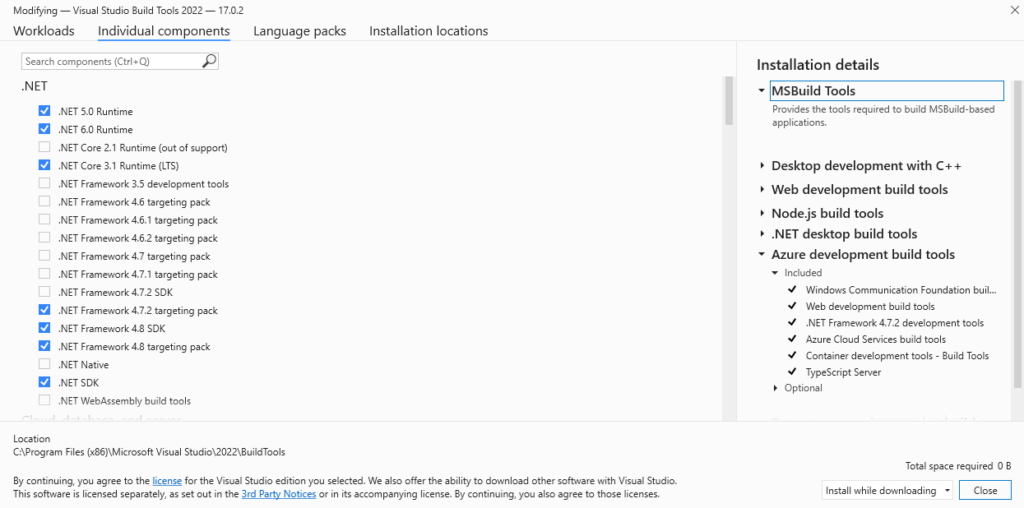
Step1: Install VS 2022 Build tools
Our first task is to upgrade the proper build tools. It looks very similar to a general Visual Studio installation.
Note: The below pictures was taken after the upgrade, but I hope it won’t be stop anyone to use this guide.
- Log in to the build server on which you want to support build processes for .NET 6 and / or VS 2022 projects
- Download the VS 2022 Build Tools
- Start to install kit
- Select the platforms which could be relevant for us
5. Select the necessary framework (don’t forget to select the .NET 6.0 Runtime…. LOL)
That’s all, after the new build tools are installed on our build server, we can continue the process: to set up a new build agent.
Step2: Getting and setting up the proper agent
Important notice: Install the new agent in case if you are in a maintenance window (or in a low level of the workload of the build server) when you can continue the upgrade process with step3 immediately after the step2 without any of your build process can run against the newly installed agent, to prevent the unwanted downgrade of that.
In addition to the previously installed build tools we need the appropriate agent also for .NET 6 projects, which version number has v2.195.2. You can find it in this repository.
For downloading the agent, we won’t use the content of the repository rather than a direct link that targets to a special storage. Only one item is important from the repo, the releaseNote.md file, which describes more details about the necessary link.
For example, for Windows x64 version we need to download and extract the next file: vsts-agent-win-x64-2.195.2.zip
After downloading the file we can extract its content in different way, for example using PowerShell:
C:\\> mkdir agents && cd agents
C:\\agents> Add-Type -AssemblyName System.IO.Compression.FileSystem ;
\[System.IO.Compression.ZipFile\]::ExtractToDirectory("$HOME\\Downloads\\vsts-agent-win-x64-2.195.2.zip", "$PWD")
After the extraction of the zip file, we have to configure the new agent.
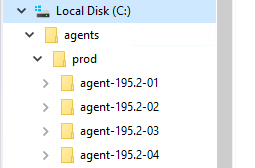
Recommendation: If we want to use different versions of agents on the same build server, an excellent way could be to differentiate each other at folder level like this.
Step3: Preventing accidentally downgrade of the newly installed agents
As I mentioned above, it is crucial to install the new agent in a maintenance period, otherwise, if a newly started build process will use this agent without special environment settings, then Azure DevOps Server will simply downgrade to the latest built-in agent’s version of our freshly installed agent. For example, it will be downgraded to 2.181.2 in case of Azure DevOps Server 2020 1.1.
To prevent this downgrade process, we have to create a new system-level environment variable:
AZP\_AGENT\_DOWNGRADE\_DISABLED=true
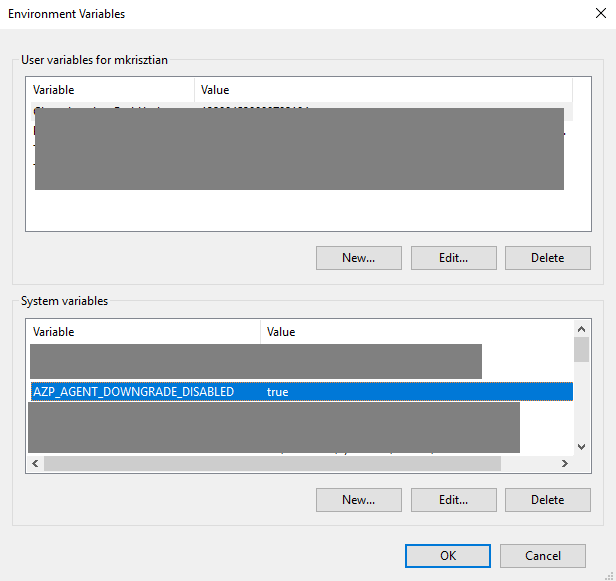
To force refresh and apply the newly inserted variable, open a new PowerShell command prompt with administrative privileges and type the following commands:
taskkill /f /im explorer.exe && explorer.exe
Step4: Install new versions of pipeline tasks
In order for the new agent to use the appropriate build tools in VS 2022, the building blocks used in the build pipeline must also be updated.
- Let’s download the following files
- Extract the downloaded file to the following folders
- C:\Install\MSBuildV1\MSBuildV1\
- C:\Install\VSBuildV1\VSBuildV1\
- C:\Install\VsTestV2\VsTestV2\
- Install the Node CLI, which we can use to install the previously downloaded and extracted building blocks
npm install -g tfx-cli
- Open a browser and navigate to the Azure DevOps Server homepage
- Create a new Personal Access Token (if we have a valid PAT with Full Access permission we can skip this step)
- Navigate to the upper right corner “User Settings”
- Select “Security” and then “Personal access tokens”
- Click “+ New Token” button
- Give a name, set the organization and select the “Full Access” as scope
- Pay attention to the expiration date (keep it minimize due to the Full Access…)
- Copy the newly generated token to a save place
- After the preparation above we can install the downloaded pipeline tasks using the newly created PAT
tfx build tasks upload -u https://myonpremserver/targetcollection -t myverysecretpat --task-path C:\\Install\\MSBuildV1\\MSBuildV1\\
tfx build tasks upload -u https://myonpremserver/targetcollection -t myverysecretpat --task-path C:\\Install\\VSBuildV1\\VSBuildV1\\
tfx build tasks upload -u https://myonpremserver/targetcollection -t myverysecretpat --task-path C:\\Install\\VsTestV2\\VsTestV2\\
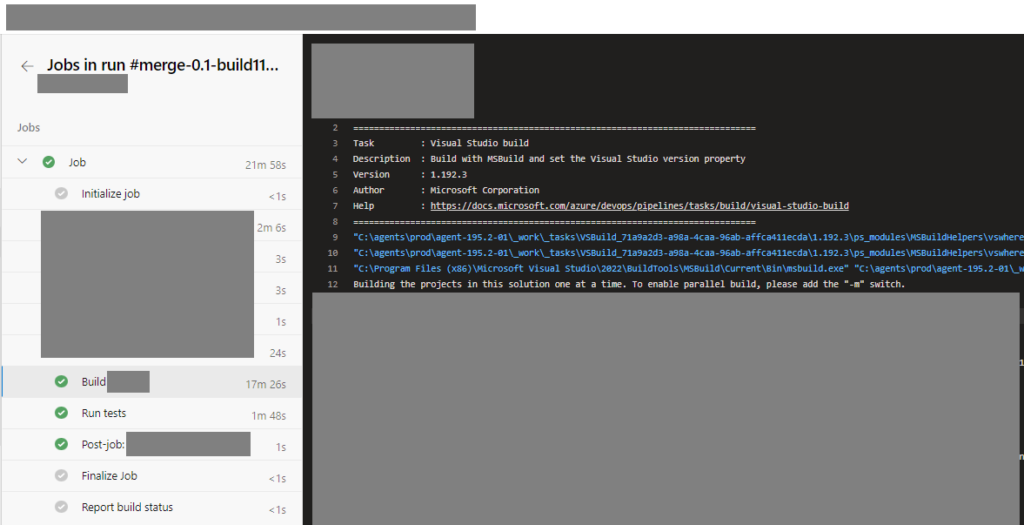
Step5: Checking the results
In case if we did everything fine, the next build pipeline will run in a proper context, and it will call the msbuild.exe which support .NET 6 projects and below.
We can see the evidence itself in the log message also (line 11 shows the using of VS 2022 build tools)
Wrap up
The above process shows you a way how you can upgrade a Windows based build server environment, but along the same principles we can upgrade a Linux/OSX vased server as well. In case of this we should download another version of the agent in step2, and of course we should use a sudo npm install -g tfx-cli command to the proper NODE CLI.
Hopefully, Azure DevOps Server 2022 will arrive within a few month, and I’m sure that it will include both the proper agent and tasks as well (just like the long-waited Delivery Plan 2.0 function), so it will be much easier to set up and to support the newest cutting edge technologies.